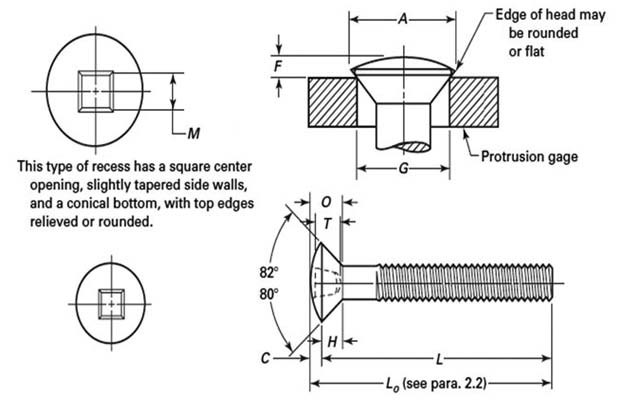
ASME B18.6.3 Type 3 Square Recessed Oval Countersunk Head Machine Screws

Dimensions of ASME B18.6.3 Type 3 Square Recessed Oval Countersunk Head Machine Screws
| Nominal Size or Basic Screw Diameter | Length, L | Head Diameter, A | Head Side Height, H | Head Crown Height, C | Total Head Height, O | Recess Across Flats, M | Recess Depth, T | Recess Size | Recess Penetration Gaging Depth | Protrusion Above Gaging Diameter, F | Gaging Diameter, G | |||
|---|---|---|---|---|---|---|---|---|---|---|---|---|---|---|
| Max | Min | Max | Min | Max | Min | |||||||||
| 3 | 1/8 | 0.187 | 0.167 | 0.059 | 0.033 | 0.092 | 0.070 | 0.066 | 0 | 0.038 | 0.028 | 0.064 | 0.044 | 0.148 |
| 4 | 3/16 | 0.212 | 0.191 | 0.067 | 0.037 | 0.104 | 0.070 | 0.066 | 0 | 0.038 | 0.028 | 0.069 | 0.048 | 0.172 |
| 5 | 3/16 | 0.237 | 0.215 | 0.075 | 0.041 | 0.116 | 0.091 | 0.106 | 1R | 0.065 | 0.050 | 0.075 | 0.053 | 0.196 |
| 6 | 3/16 | 0.262 | 0.238 | 0.083 | 0.045 | 0.128 | 0.091 | 0.106 | 1R | 0.065 | 0.050 | 0.080 | 0.057 | 0.220 |
| 8 | 1/4 | 0.312 | 0.285 | 0.100 | 0.052 | 0.152 | 0.112 | 0.127 | 2R | 0.075 | 0.060 | 0.091 | 0.066 | 0.267 |
| 10 | 5/16 | 0.362 | 0.333 | 0.116 | 0.060 | 0.176 | 0.112 | 0.127 | 2R | 0.075 | 0.060 | 0.102 | 0.075 | 0.313 |
| 12 | 3/8 | 0.412 | 0.380 | 0.132 | 0.068 | 0.200 | 0.133 | 0.158 | 3R | 0.095 | 0.080 | 0.113 | 0.084 | 0.362 |
| 1/4 | 7/16 | 0.477 | 0.442 | 0.153 | 0.079 | 0.232 | 0.133 | 0.158 | 3R | 0.095 | 0.080 | 0.129 | 0.095 | 0.424 |
| 5/16 | 1/2 | 0.597 | 0.556 | 0.191 | 0.099 | 0.290 | 0.191 | 0.194 | 4R | 0.100 | 0.085 | 0.155 | 0.117 | 0.539 |
| 3/8 | 9/16 | 0.717 | 0.670 | 0.230 | 0.117 | 0.347 | 0.191 | 0.194 | 4R | 0.100 | 0.085 | 0.182 | 0.139 | 0.653 |
Note :
- Where specifying nominal size in decimals, zeros preceding the decimals and in the fourth decimal place shall be omitted.
- Screws of these length and shorter shall have undercut heads.
- Tabulated values determined from formula for maximum H in Appendix A.
- "R" in the recess size tabulation means regula depth recess.
- Square recesses incorporate a slight taper on the side of the recess. This taper can result in loss of penetration gaging depth on finished fasteners due to the build up of plating in the recesses. The recess penetration dimensions specified here are for finished (plated) product. Manufactures should be advised that they should not use all this tolerance in the heading process, or an out of tolerance condition could exist after plating.
- No tolerance for gaging diameter is given. If the gaging diameter of the gage used differs from tabulated value, the protrusion will be affected accordingly and the proper protusion values must be recalculated using the formulas.
